SwitchVox
Requirements
Both the installed DuVoice and installed Switchvox versions need to be modern. Older versions are incompatable.
- SwitchVox Version 8.0 (and above).
- DuVoice DV2000 Version 8.0 (and above).
Preface
Additionally, here is a note regarding the variables throughout this document:
- If you see a variable, for example on this document:
<dv-ext-num>.- This variable is used in multiple places, so it's important to make note of them.
- The variables on the SwtichVox configuration is up to the PBX technician to pick the best option to follow the rest of their PBX configuration.
- Then the DuVoice technician will need to know the information so that they can add the same parameters to the DuVoice server for integration.
Hospitality Integration
PBX Configuration
We want to log into the SwitchVox with the default admin account to create an account specifically for DuVoice.
- First log in to the SwitchVox with the default admin account.
- Click the 'Setup' drop down menu.
- Under the 'Admins' sub-menu, click the 'Manage' option.
- Click the 'Create Admin' button.
- Under the 'General Information' tab configure the following:
- Set the 'Login Name' to
duvoicepbxlink.- This will be the
<pbx-link-acc>.
- Set a good password in the 'Password' field.
- This will be the
<pbx-link-pass>.
- Under the 'Permissions' tab configure the following:
- Extensions: Read/Write
- Phones: Default
- Call Routing: Default
- Admins: Default
- PBX Features: Default
- Notifications: Default
- Extension Features: Default
- Media: Default
- Call Reports: Default
- Queue Reports: Default
- Custom Reports: Default
- Diagnostics: Default
- Maintenence: Default
- Networking: Default
- Then click on the 'Save Admin' button.
DuVoice Configuration
This PBX link, according to the manual page here supports changing the first and last name of extensions.
- Log in to the desktop of the DuVoice server.
- Open the 'DV2000 Manager' application.
- Click on the 'system' drop down option.
- Click on the 'profiles' option.
- To create a new profile, click 'add'.
- On this window, within the 'details' tab, set 'PBX' drop down to
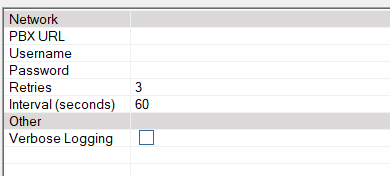
SwitchVox. - Then under the 'SwitchVox' tab, configure the following:
- PBX URL: enter the HTTPS url to log into the SwitchVox (usually just the IP address with the correct prefix).
- Example:
https://192.168.100.77
- Username:
- This will be the
<pbx-link-acc>.
- Password:
- This will be the
<pbx-link-pass>.
- Save this information and close out of the window.
Telephony Integration
Regarding MWI
- For MWI configuration, please refer to our SIP notify page here.
- Please note: SwitchVox does not support direct to PBX MWI integration.
- If using SIP phones, follow the 'To Phones' page.
- If using SIP gateways with analog phones, follow the 'To Gateways' page.
SwitchVox Configuration
Overview:
- First, need to program an extension that DuVoice can register to.
- Then we'll go over setting up an extension, and how to route it to DuVoice for voicemail.
Configure SIP Extension for DuVoice
Creating and configuring a SIP extension for DuVoice to register to.
- Click the 'Setup' drop down menu.
- Under the 'Extensions' sub-menu, click the 'Manage' option.
- Click the 'Create Extension' button.
- Select: Extension Type = SIP phone or SIP adapter for Analog Phone (ATA)
- Select: Extension Template = default
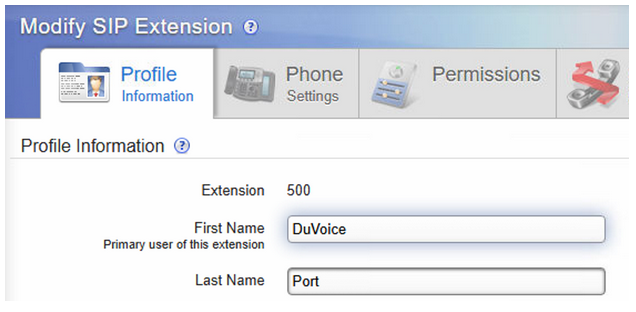
- Create extension with the following information:
- Extension =
<dv-ext-num> - First name =
DuVoice - Last name =
Port - Password =
<dv-ext-pass> - Numeric PIN =
<dv-ext-pin>
- Click 'save SIP Extension' button.
Example screenshot:
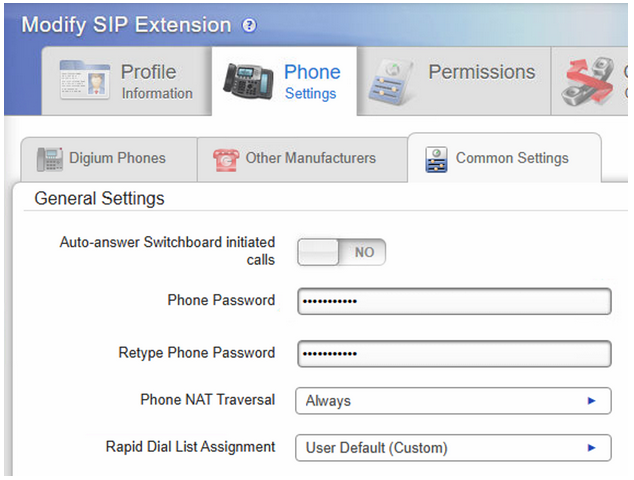
- Click on the 'Phone settings' tab.
- Then click on the 'Common Settings' sub-tab.
- Set the following information:
- 'Phone password' =
<dv-ext-pass>
Example screenshot:
Voicemail Users' Extension Setup
How to set up an extension as mailbox.
Create Extension:
- 'Setup' drop down menu.
- Under the 'Extensions' sub-menu, click the 'Manage' option.
- 'Create Extension' button.
- Extension Type = SIP phone or SIP adapter for Analog Phone (ATA)
- Extension Template = default
- Create extension:
- Extension =
<mb-num> - First name =
<mb-fn> - Last name =
<mb-ln> - Password =
<mb-pass> - Numeric PIN =
<mb-pin>
- Click 'save SIP Extension' button.
Configure RNA forwarding:
- Click the 'Setup' drop down menu.
- Under the 'Extensions' sub-menu, click the 'Manage' option.
- Find the user you'd like to edit.
- Click on the button that has a door icon to 'login as this user'.
- This will open a new tab in the web browser.
- Click the 'Features' drop down menu.
- Under the 'Features' sub-menu, click the 'Call Rules' option.
- On this window, remain on the 'Unanswered Call Rule Sets' tab.
- Find the call rule called 'Default Standard'.
- Click on the button that has a pencil icon to 'edit call rule'.
- Click on the 'Create Action' button.
- Click on the 'Call Forward' button, and configure the following:
- Type of call:
direct calls. - Extension to forward to:
<dv-ext-num>.
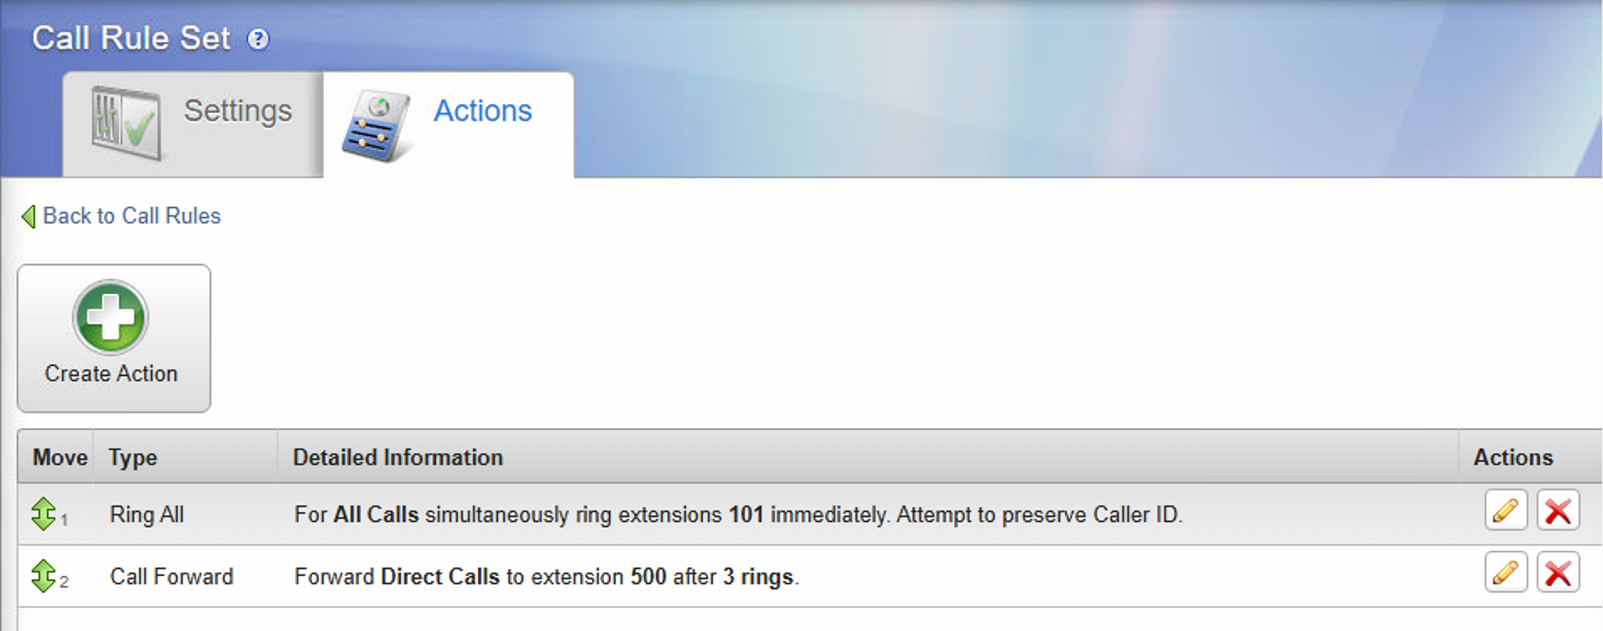
- Now there should be two listed options:
- First, is going to be rule to ring the extension's phone itself.
- Second should be the DuVoice forwarding rule.
- It should say: Forward Direct Calls to
<dv-ext-num>after 3 rings.
Example Screenshot:
DuVoice Configuration
Installation Wizard
- First, select 'asterisk based pbx'.
- Then select the 'switchvox' option.
Telephony Settings
Launch DV2000 Manager application:
- Click on the 'Telephony' drop down menu.
- Click on the 'Settings' option.
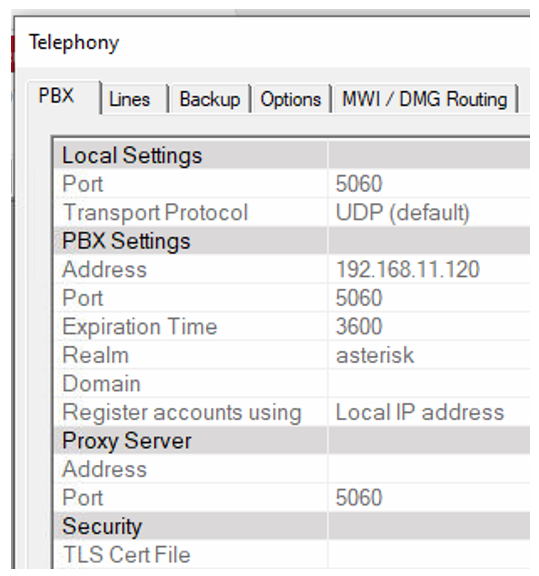
- Navigate to 'PBX Tab' and configure the following:
- Address =
<switchvox-ip> - Realm =
asterisk - Register accounts using = Local IP address
Example screenshot:
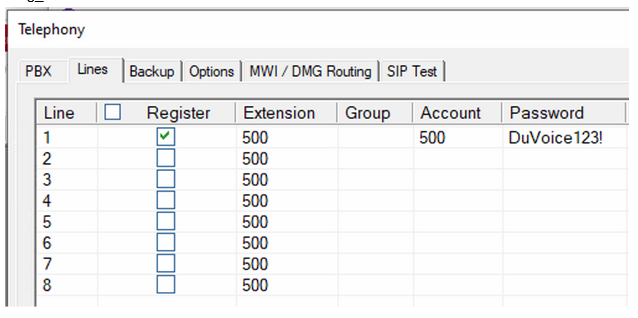
Then go to the 'Lines' tab and configure the following:
For first line only:
- Register = checked
- Extension =
<dv-ext-num> - Account =
<dv-ext-num> - Password =
<dv-ext-pass>
For rest of the lines:
- Register = unchecked
- Extension =
<dv-ext-num>
Example screenshot:
Go to 'options' tab:
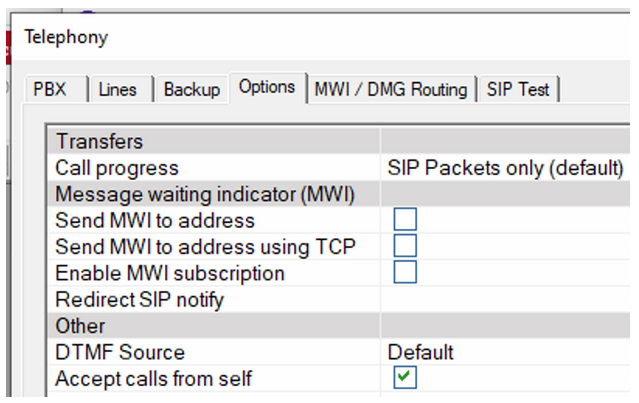
- Under 'other' section.
- 'accept calls from self' = checked
- Hit 'ok' button.
Example screenshot: